Wednesday, December 12, 2018

Products & Manuals


Subscribe by Email!

Electric RC Aircraft Guy Products:
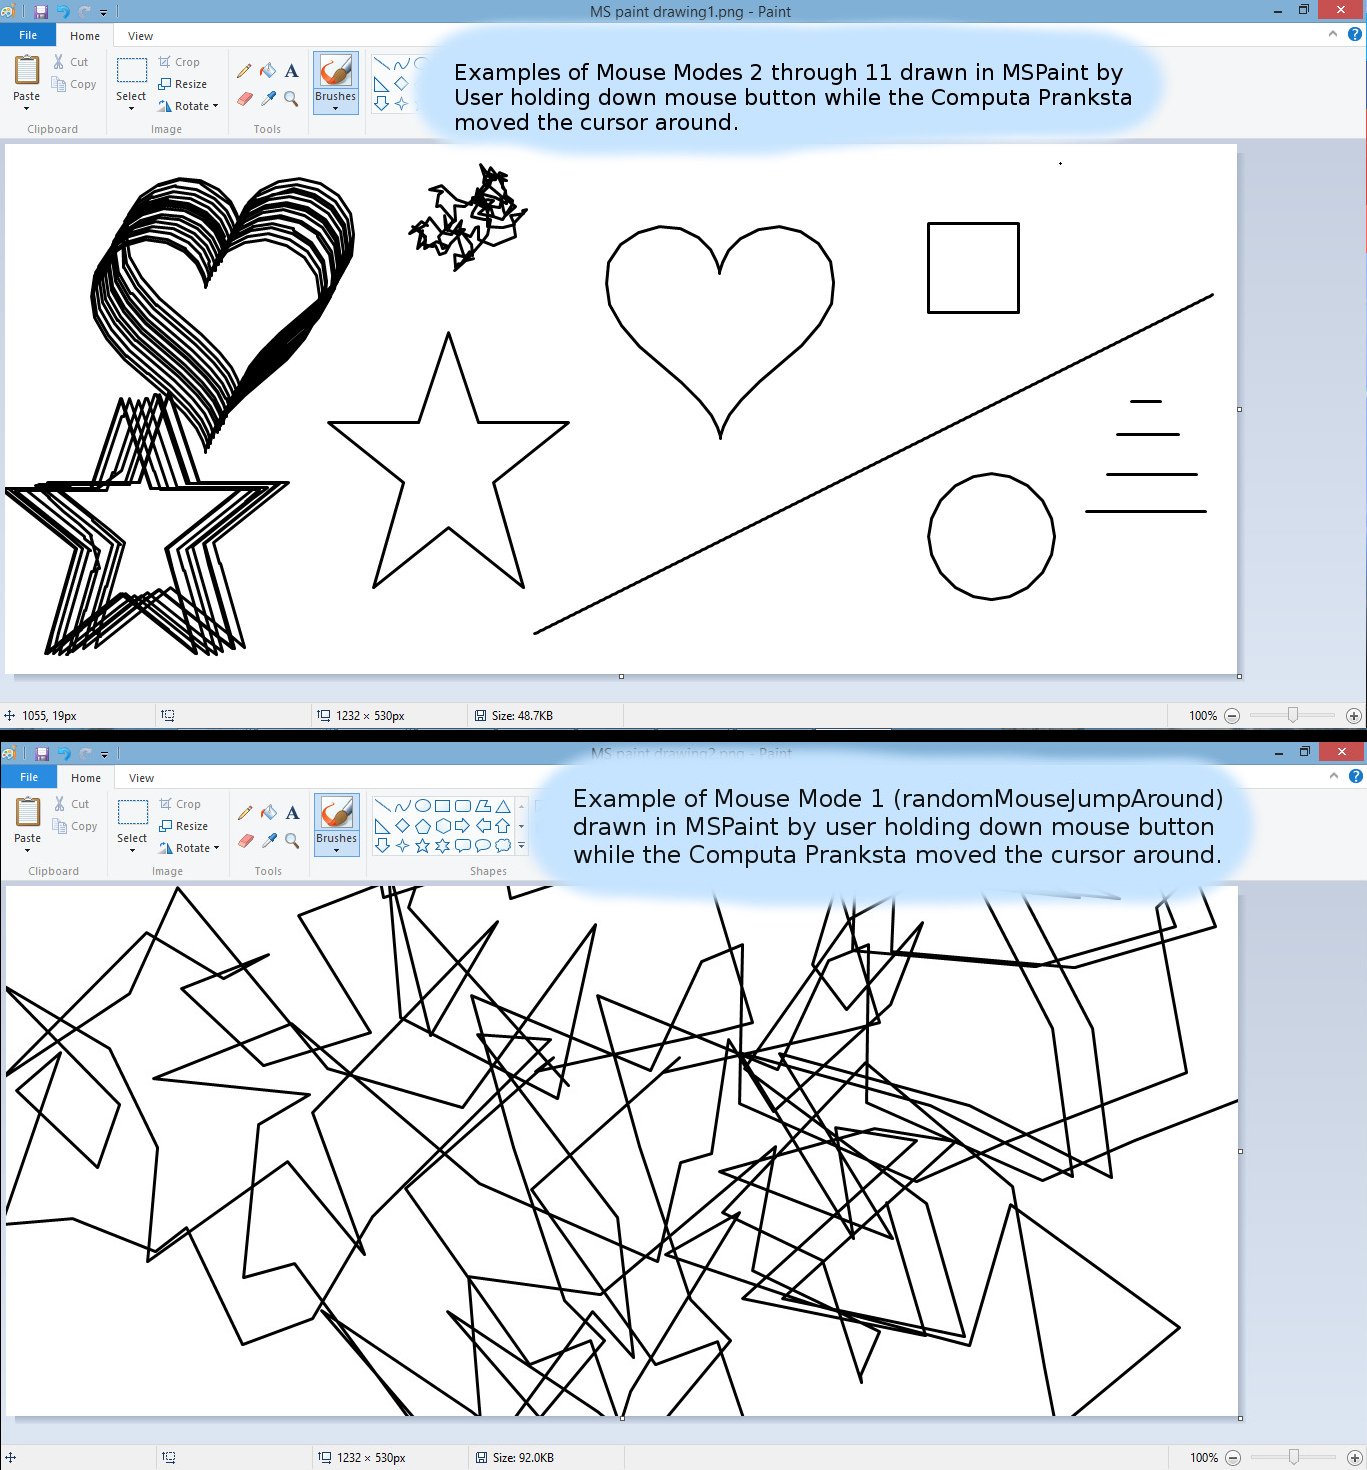
  1. Computa Pranksta USB Mouse & Keyboard Device User Manual
    1. Buy on Amazon
    2. Buy on Ebay
  2. 8x10 Einstein Quote calligraphy PCB art, by Alexa Staples: "I have no special talent. I am only passionately curious."

    1. CAD rendering: 
    2. Actual photographs of front and back:
    3. Actual photos on display in the entryway of our house:
    4. Buy Now on Etsy! https://www.etsy.com/shop/eRCaGuy
    5. Buy Now on Amazon!https://amzn.to/2WWIwKo
Coming Soon!:
  1. Electric Skateboard Brake Saver Charger Adapter
    1. Preliminary photos & info. on Reddit: https://www.reddit.com/r/MeepoBoards/comments/9p6zz1/brake_failure_on_hills_solved_with_a_custom/ 
Written: 12 Dec. 2018
Last Updated: 8 June 2019

History (newest on top):
20190608 - Added photos of Einstein quote and link to the sales page on Amazon
20181220 - Einstein calligraphy quote now on Etsy! So, moved this entry from the Coming Soon section to the top in the Products section.
20181212 - first written

END

Keywords: products, manuals, electric rc aircraft guy computa pranksta user manual, electric rc aircraft guy computer prankster user manual

Draft Time: [30 min]

***Subscribe by Email!***

Tuesday, July 3, 2018

How to install and use KiCad FreeRouting/FreeRoute auto-router (incl. manual board cleanup & DRC) in KiCad 5


Subscribe by Email!


Watch video above.
Direct link: https://www.youtube.com/watch?v=ESrHILARL7Y.

I go through:

1) How to download and "install" (copy over) the necessary (and pre-compiled) freeroute.jar ("freeRouting.jar") binary.

2) (Briefly): how to use the auto-router to route a couple boards (1 trivial, 1 less trivial), including back-importing the routed boards back into KiCad.

Note: the crux of this demo is done by 6:00! By this point I have shown how to install the freeroute.jar executable file and use the auto-router to route a board! Feel free to stop at this point.

3) How to download the KiCad source code and demo project files (ex: to use as demo tools to test the autorouter).

4) How to work around a minor bug in the autorouter that sometimes makes it not allow you to output the routed board .ses file.

5) How to rename board layers.

6) How to do manual board cleanup, including DRC (Design Rules Check), manual trace modifications and dragging, Interactive Router Settings (very brief mention), board ground fill (brief), and how to fix ground fill problems such as floating fill islands which need to be connected via a few vias and traces.

7) The end-result is a nice, auto-routed board (auto-routing is so convenient!) with minimal hand-cleanup ready to be sent off to the manufacturer.

I'm super happy to have the auto-router working so that I can use it for quick-and-dirty jobs that require a faster design speed and less manual work at the sacrifice of a bit of perfection.

Thanks for watching!

Links you will need from the video:
1) https://freerouting.org/freerouting/using-with-kicad
2) https://github.com/KiCad/kicad-source-mirror

By Gabriel Staples
Written: 3 July 2018
Last Updated: 3 July 2018

END

Keywords: KiCad autorouter, KiCad auto-router, KiCad freerouter, KiCad freerouting, using the KiCad freerouter, PCB layout, DRC check, Design Rules Checking

Draft Time: ~ 3 hrs.

***Subscribe by Email!***

Wednesday, June 6, 2018

What is Hardware in the Loop (HIL) and Software in the Loop (SIL) Testing?


Subscribe by Email!
By Gabriel Staples
Written: 6 June 2018
Last Updated: 7 June 2018

Quadcopter navigation algorithm SIL test (live video).
In mechatronics and control theory, testing is an important part of controller validation. You need to run experiments to prove that your software/analog/digital controller, actuator, algorithm, etc, does what it’s supposed to do. Experiments, however, can be expensive, time-consuming, difficult,
dangerous, or even impossible to test under all conditions. Therefore, you can do Hardware in the Loop (HIL) testing and Software in the Loop (SIL) testing/simulation to aid the testing, verification and validation of your controller without having to resort to pure, fully-physical testing with actual products under actual conditions.


***Subscribe by Email!***

Saturday, May 26, 2018

Best-value sub-$100 soldering equipment purchase I've ever made!


Subscribe by Email!

By Gabriel Staples
Written: 26 May 2018
Last Updated: 26 May 2018

Related post: Recommended Soldering Kit & Tutorials (for Arduino, Electronics, & Radio Control)


My review on my latest desoldering tool purchase (< $10)!

I just bought this Velleman desoldering iron/vacuum (desoldering pump) for ~$10 on Amazon. It worked so well I wanted to share my review directly, since it could have saved me dozens of hours and tons of frustration before when I was newer to soldering and trying to desolder through-hole parts with lots of legs, such as switches. It is SUCH a great value and would have prevented me from destroying or damaging several circuit boards in the past!

My Review title: Best-value sub-$100 soldering equipment purchase I've ever made!
By Gabriel S on May 19, 2018
Verified Purchase


***Subscribe by Email!***

Sunday, January 28, 2018

How to clone your hard drive using free and simple open-source tools (w/any OS on your cloned drive!)


Subscribe by Email!
By Gabriel Staples
Written: 28 Jan. 2018
Last Updated: 28 Jan. 2018

Last Article:
This Article:
I just upgrade my hard drive to an SSD (Solid State Drive). Now my computer runs soooo much faster! It's usable again! No matter what operating system you have, the following instructions will work, since we will simply be using free and open source, and also no-cost, tools to copy your drive data, byte by byte, from one drive to another. In other words, the copy technique doesn't even read files, as it doesn't know what files are, so it doesn't care what file structure or format you have. It just reads bytes. I'm pretty excited that such great free tools exist. No need to buy Acronis, just do this.

How to clone your hard drive:

1. Buy an external hard drive USB enclosure. Ex: Sabrent Ultra Slim USB 3.0 to 2.5-Inch SATA External Aluminum Hard Drive Enclosure [Black] (EC-UK30) ($8.99).

2. Buy a nice new SSD. Ex: Samsung 860 EVO 1TB 2.5 Inch SATA III Internal SSD. Place the 860 EVO into the enclosure and plug it in.

3. Make a bootable USB flash drive containing Linux Ubuntu 16.04, or whatever the latest LTS (Long-Term Support) version is at the time.


***Subscribe by Email!***

Saturday, January 20, 2018

10-Second $10 Upgrade to Triple Your Raspberry Pi 3 Network Speed


Subscribe by Email!
By Gabriel Staples
Written: 20 Jan. 2018
Last Updated: 20 Jan. 2018

Site Map/Table of Contents


tldr;

Buy one of these USB to Gigabit Ethernet adapters for $10, plug it in to your Raspberry Pi 3 and voilá! Your new Pi 3 Ethernet connection is now 3x faster than the built-in Ethernet port and 12x faster than the built-in WiFi adapter (source: see my test results below)!

This really matters when you're using your Pi 3 as a network device, server, router, hotspot, NAS, or remote development machine. Pretty much it really matters whenever you want it to work better on your local or wide area network, which includes ssh-ing or otherwise remoting into it.

Details:


***Subscribe by Email!***